Monday, 26 December 2011

Christmas Day


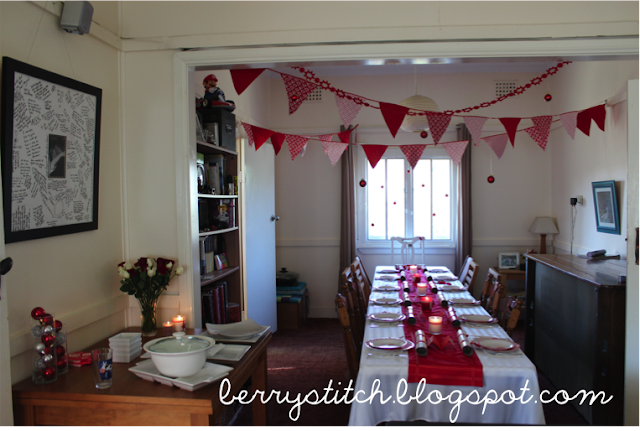
For the first time since we have lived in our house (almost 7 years) we were able to host Christmas lunch. Unfortunately, not everyone was able to make it on Christmas day this year, so we took the chance of not having as many people as usual to squeeze into our little lounge room. I chose a white & red colour scheme and sewed a few things for the occasion. I had been inspired from a few blogs to try and make some bunting flags. After purchasing some festive red and white prints I fused strips together and used pinking shears to cut them into triangles.


It was a wonderful day! My parents, in-laws, grandparents and brothers were all able to join us. Each with their own name card, which, of course, fitted into the theme of red and white.


For those that know me, I am a little anal, so, if it wasn't red or white, or necessary for eating, it wasn't allowed... hehe.. I strung up some red baubles and a felt cut-out string from the window and the arch way. Another thing I sewed for the day was a table runner. It was plain red, and straight (nothing all that fancy) with some ribbon sewed down the sides and the end. At the side was our food table, decorated with just a few red and white things.


Thank you for a lovely day family! I love you all and I hope you enjoyed it..

The next couple of photos are just of some biscuits I made and wrapped up for my friends for Christmas.


Have a wonderful Christmas!

Friday, 23 December 2011

Mascarpone Tarts

 Every school holidays, I meet up with some of my lovely friends, old colleges, from when I worked in pharmacy. I bring them lunch, and some sort of treat. Last time I visited I took choc-musli biscuits, which, although they were delicious, after showing them some pictures from my blog, they insisted that I make something 'yummy' for the, next time.
I was flicking through some old 'Better Homes and Gardens' magazines and found these little tartlets, that seemed really easy and looked delightful.


Ingredients:
Pastry
- 1 3/4 cups plain flour
- 1/3 cup pure icing sugar
- 185g unsalted butter, chopped
- 1 egg yolk (keep the egg white for glazing)
- 1 tbsp iced water
- 1 tsp vanilla essence

Filling
- 200g mascarpone
- 1/4 cup caster sugar
- 2 tsp vanilla essence
- 1 punnet small strawberries, sliced


Method:
1. Preheat oven to 200 degrees celsius. Put flour and icing sugar in a food processor, process to combine. Add the butter and process again until the mixture resembles fine breadcrumbs. Put the egg yolk, water and vanilla essence in a small bowl and whisk to combine.

2. Add the egg mixture to the flour mixture and process in short bursts until both come together to make a pastry. Remove and knead gently to form a ball. Wrap in baking paper and chill for 15-20min.

3. Roll out the pastry between 2 sheets of baking paper to 4mm thick. Cut out rounds using a 5cm round cutter, and ease the rounds into muffin tins. Brush each tart with egg white and prick with a skewer. Bake for 15-20mins or till golden and crisp. Stand on a wire rack to cool.

4. Put the mascarpone, sugar and vanilla essence in a small bowl and mix to combine. Spoon mixture into cold pastry cases, top with strawberries.


Monday, 12 December 2011

Elephant Pin Cushion


Isn't this sweet! I had been researching some different pin cushion ideas and after a while I came across this Heather Bailey 'Ellie & Ollie' Elephant pincushion. I made one, as a present, before the one pictured, so this was my second attempt. I just love it!


Look what my man made!! - Stained Glass Shortbread


As much as I love to bake, I have a confession... My husband is much better at it than I am. Recently I had these stained glass window shortbread biscuits on my list to make for my colleagues, however, ran out of time.. As I was a little overwhelmed with the things that I had to do, my wonderful husband offered to make them for me. 

I found the recipe in the 2011 Christmas edition of Super Food Ideas and thought they were very christmassy. It is a basic shortbread recipe, which you cut any desired shape out of, and then place a boiled lolly in the centre. Once cooked, just sprinkle with sugar. I struggled to find boiled lollies which did not have a white swirl in them, so they turned out a little more opaque than I had pictured. 


Sunday, 27 November 2011

Pleated Clutch Bags


Although I have been sewing for many years, I have never managed to master putting a zip in a bag, so I decided it was time that I taught myself. After watching a few blogs and looking at a few tutorials, I found this cute little clutch tutorial.


The first was a little bag for my hand bag, to keep all of those left over bits & pieces that float around the bottom of my bag. The aqua floral and pink material is some which I had left over from a quilt that I made and I just love these colours, so I decided what better way to use them.


The next bag that I made was for my Secret Pal. I had wanted to make her something handmade, which was a little more sophisticated than the red felt dove. I had recently made a cushion for a friend and had a range of olive coloured materials left over and loved this darker one. After making the bag I placed a few  manicure bits and pieces in it. I hope she liked it.


Sunday, 30 October 2011

Vanilla & Passionfruit Whoopies

Well, this is my first try of a recipe out of my new cookbook from my secret pal -
Vanilla & Passionfruit Whoopies...


Ingredients:
- 125g unsalted butter, just softened
- 165g caster sugar
- 1 egg, at room temperature
- 1 tsp vanilla essence
- 300g plain flour
- 1 tsp baking powder
- 1/2 tsp bicarbonate of soda
- 150ml milk
- 1 quantity vanilla butter cream with fresh passionfruit pulp


1. Preheat oven to 180 degrees. Line 3 baking trays with baking paper.

2. Use an electric mixer to beat the butter and sugar in a medium bowl, until pale and creamy.

3. Sift the flour, baking powder and bicarbonate of soda together. With the mixer on low speed, add flour mixture and milk alternately in two separate batches each. Beat on low speed for 2 minutes.

4. Spoon even, heaped tablespoons of mixture onto trays, leaving 5cm for spreading. Bake for 12 minutes, swapping trays around at 8 minutes.

5. When cooled, spread vanilla butter cream on one half and sandwich together


Recipe taken from 'Make Me Whoopies'

Saturday, 22 October 2011

Christmas Dove Ornament


As I have mentioned before, we are holding a secret pal at my workplace, so I have been taking up the opportunity to make a few things to give my secret pal. Last week I made some 'Glace' Cherry Bites' and packaged them in a coffee cup. This week I wanted to make something a little Christmasy. This cute Christmas Dove Ornament is featured in this months issue of 'Better Homes & Gardens Magazine' and was very fun to make. I hope she likes it!